We are half way there. You know six songs , four strum patterns, and can form the D and the C chords on your own. You’re doing great! Now, you are ready for the next step, so remove that G tab, as demonstrated in the Video Lesson – 15 Lesson Removal of “G” Tab.
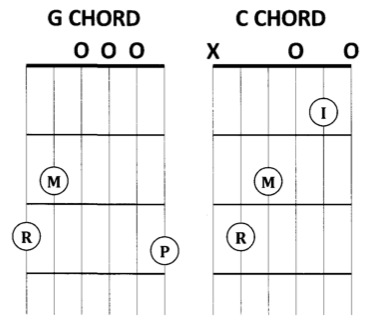
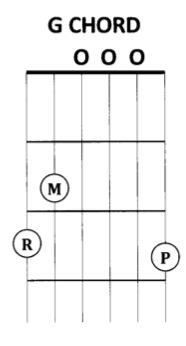
To form the G chord, you will place your middle finger on the fifth string at the second fret, your ring finger on the sixth string at the third fret, and your pinky finger on the first string at the third fret, as indicated in the diagram to the right.
Now, form the G chord with your left hand, and give it a few strums. Make sure all of the strings ring clearly. If not, adjust your finger (s), as necessary, to eliminate any muted or buzzing strings.
Make sure you do not skip the muscle memory exercises (pulsing and lifting) we learned in Lesson 10 to lock in the G chord.
Now, it’s time to learn a secret to make learning new chords a little easier.
Common Chord Shapes
Some guitar instruction may teach you to form the G chord with your index, middle, and ring fingers. I highly recommend that you stick  with the finger placement as we teach it for the simple reason that it will make the transition from G chord to C chord so much easier.
Let’s examine the G and C chords to look at what they have in common. Notice that the middle and ring fingers have the same basic position – the middle fingers both are at the second fret, and the ring fingers are both at the third fret. This is called a “common chord shape.”
So, when you change from the C chord to the G chord, all you have to do is move your middle and ring fingers up one string, drop the pinky, and add the index finger on the second string first fret. Isn’t that easy.
When learning new chords, always look for what they have in common to make the learning process easier.
Now, go back to the chord changeover we learned before: 15 Lesson – C chord, except practice changing from C to G and from D to G.
As soon as you are ready, go back and work your way through the last four songs, On Top of Old Smokey, Ring of Fire, Let it Be and Brown Eyed Girl.We are half way there. You know six songs , four strum patterns, and can form the D and the C chords on your own. You’re doing great! Now, you are ready for the next step, so remove that G tab, as demonstrated in the Video Lesson – 15 Lesson Removal of “G” Tab.
To form the G chord, you will place your middle finger on the fifth string at the second fret, your ring finger on the sixth string at the third fret, and your pinky finger on the first string at the third fret, as indicated in the diagram to the right.
Now, form the G chord with your left hand, and give it a few strums. Make sure all of the strings ring clearly. If not, adjust your finger (s), as necessary, to eliminate any muted or buzzing strings.
Make sure you do not skip the muscle memory exercises (pulsing and lifting) we learned in Lesson 10 to lock in the G chord.
Now, it’s time to learn a secret to make learning new chords a little easier.
Common Chord Shapes
Some guitar instruction may teach you to form the G chord with your index, middle, and ring fingers. I highly recommend that you stick  with the finger placement as we teach it for the simple reason that it will make the transition from G chord to C chord so much easier.
Let’s examine the G and C chords to look at what they have in common. Notice that the middle and ring fingers have the same basic position – the middle fingers both are at the second fret, and the ring fingers are both at the third fret. This is called a “common chord shape.”
So, when you change from the C chord to the G chord, all you have to do is move your middle and ring fingers up one string, drop the pinky, and add the index finger on the second string first fret. Isn’t that easy.
When learning new chords, always look for what they have in common to make the learning process easier.
Now, go back to the chord changeover we learned before: 15 Lesson – C chord, except practice changing from C to G and from D to G.
As soon as you are ready, go back and work your way through the last four songs, On Top of Old Smokey, Ring of Fire, Let it Be and Brown Eyed Girl.We are half way there. You know six songs , four strum patterns, and can form the D and the C chords on your own. You’re doing great! Now, you are ready for the next step, so remove that G tab, as demonstrated in the Video Lesson – 15 Lesson Removal of “G” Tab.
To form the G chord, you will place your middle finger on the fifth string at the second fret, your ring finger on the sixth string at the third fret, and your pinky finger on the first string at the third fret, as indicated in the diagram to the right.
Now, form the G chord with your left hand, and give it a few strums. Make sure all of the strings ring clearly. If not, adjust your finger (s), as necessary, to eliminate any muted or buzzing strings.
Make sure you do not skip the muscle memory exercises (pulsing and lifting) we learned in Lesson 10 to lock in the G chord.
Now, it’s time to learn a secret to make learning new chords a little easier.
Common Chord Shapes
Some guitar instruction may teach you to form the G chord with your index, middle, and ring fingers. I highly recommend that you stick  with the finger placement as we teach it for the simple reason that it will make the transition from G chord to C chord so much easier.
Let’s examine the G and C chords to look at what they have in common. Notice that the middle and ring fingers have the same basic position – the middle fingers both are at the second fret, and the ring fingers are both at the third fret. This is called a “common chord shape.”
So, when you change from the C chord to the G chord, all you have to do is move your middle and ring fingers up one string, drop the pinky, and add the index finger on the second string first fret. Isn’t that easy.
When learning new chords, always look for what they have in common to make the learning process easier.
Now, go back to the chord changeover we learned before: 15 Lesson – C chord, except practice changing from C to G and from D to G.
As soon as you are ready, go back and work your way through the last four songs, On Top of Old Smokey, Ring of Fire, Let it Be and Brown Eyed Girl.We are half way there. You know six songs , four strum patterns, and can form the D and the C chords on your own. You’re doing great! Now, you are ready for the next step, so remove that G tab, as demonstrated in the Video Lesson – 15 Lesson Removal of “G” Tab.
To form the G chord, you will place your middle finger on the fifth string at the second fret, your ring finger on the sixth string at the third fret, and your pinky finger on the first string at the third fret, as indicated in the diagram to the right.
Now, form the G chord with your left hand, and give it a few strums. Make sure all of the strings ring clearly. If not, adjust your finger (s), as necessary, to eliminate any muted or buzzing strings.
Make sure you do not skip the muscle memory exercises (pulsing and lifting) we learned in Lesson 10 to lock in the G chord.
Now, it’s time to learn a secret to make learning new chords a little easier.
Common Chord Shapes
Some guitar instruction may teach you to form the G chord with your index, middle, and ring fingers. I highly recommend that you stick  with the finger placement as we teach it for the simple reason that it will make the transition from G chord to C chord so much easier.
Let’s examine the G and C chords to look at what they have in common. Notice that the middle and ring fingers have the same basic position – the middle fingers both are at the second fret, and the ring fingers are both at the third fret. This is called a “common chord shape.”
So, when you change from the C chord to the G chord, all you have to do is move your middle and ring fingers up one string, drop the pinky, and add the index finger on the second string first fret. Isn’t that easy.
When learning new chords, always look for what they have in common to make the learning process easier.
Now, go back to the chord changeover we learned before: 15 Lesson – C chord, except practice changing from C to G and from D to G.
As soon as you are ready, go back and work your way through the last four songs, On Top of Old Smokey, Ring of Fire, Let it Be and Brown Eyed Girl.
